streetpainting.net
Begun in 1998, streetpainting.net is a resource for street painting technique
and the official gallery for the 3D paintings by reknowned artist, Julie Kirk Purcell
Begun in 1998, streetpainting.net is a resource for street painting technique
and the official gallery for the 3D paintings by reknowned artist, Julie Kirk Purcell


In 1992 Julie Kirk Purcell began her street painting career at a small, local festival in southern California. What began as a “bit of fun” has developed into a full time passion involving hundreds of paintings in places as exotic as Hong Kong, Thailand, the middle East and Europe, as well as numerous corporate clients at home in the United States. Companies such as Disney, Universal Studios, the Howard Hughes Corporation , Bloomburg LLP and the Chrysler Corporation as well as various cities around the world have asked her to create her one of a kind 3D paintings. In 2009 she was invited to author a book about street painting technique, and a year later “Sidewalk Canvas” was published and available to new artists in the quickly growing medium. Shortly after she helped found a company dedicated to 3D street painting but in 2013 Julie left the company. It was a year that saw many changes, all positive. A huge commission to produce an international cadre of artists for the Disney Company’s “Limited Time Magic” Promotion put her in charge of 54 artists on two coasts – all of which went smoothly and resulted in some tremendous art, including the combined floor and wall 3D painting that she created at the same event. The event left her with a renewed purpose to push her limits as an artist and to continue her own personal growth in the medium that she has helped spread around the world with her commissions, lectures and workshops.
Julie lives with her family and myriad of animals in southern California - please feel free to check for availability for workshops, lectures and commissions.
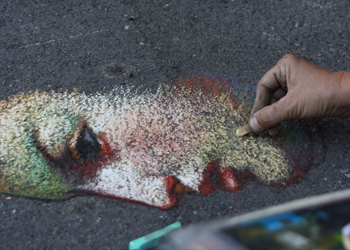
There are as many different ways to paint a street painting, as there are painters to paint them. Styles can range all the way from tightly rendered photo-realistic work to very loose, Impressionistic styles of painting. Most directions share some specifics. One of these is that, in order to build up the pastel and try to get a feeling of something painted on the ground, rather than a rougher "chalk" feeling to the work, the artist needs to build up layers of pastels. It helps, even when doing the Impressionist style of paint stroke, to put at least a layer or two down underneath of blended pastel base. The base does a couple of things - it fills in the black of the asphalt (or whatever surface you are working on) so that the color is solid. Another thing it accomplishes is to give you a color to work on which helps blend in and make the next layer of pastel spread a bit farther and easier. When laying down that base of color, you might vary what colors you put down according to what you are painting. Bases of black and white are discouraged except in areas that will remain black or white - black pastel mixes in with any color and dulls it, and white makes any color a tint, thereby dulling it also. One thing to remember when working with pastel is that every color put down has an affect on the other colors it is mixed with. Unlike paint layers which dry and might have very little affect on future painting, pastel mixes up to the next layer, and can be mixed into the surrounding areas if care is not used. When laying down areas that are trying to indicate light and shadow sides, therefore, it is best to use colors that are those values for those areas i.e. use dark browns or something similar for the shadow areas of skin, and use peach and yellow tones for the lighter areas of skin.
As you build up subsequent layers, try blending less and less. On the top-most layers I blend the least or not at all. If I do any blending on these layers, it is with the actual chalk stick, lightly sweeping it over and over, color into color, and not blowing off the dust when I'm done. If the pastel marks are a tad too harsh, I'll lightly tamp it down with my fingertips to soften and settle the marks onto the asphalt. This section brings another question to mind: what do you use to blend with?
There are lots of different ways to blend and it is up to the inidividual artist what method they prefer or what finish they are trying to achieve. You can use latex gloves or fingertips - these have the added benefit of protecting your hands from the pigments, but they are not always comfortable for blending and can get very hot. Another tool is the chalkboard eraser. The eraser is great for filling in broad areas of color quickly. It is usually best to have an eraser dedicated to a color, such as one used only for black areas, as the chalk dust can build up inside the eraser and the color will affect what you do later. Some people buy cheap erasers and tear the felt strips out of them, using those for blending. I've seen people use just about anything else you can think of - pieces of terry cloth, pieces of charcoal chamois, make-up applicators, you name it. One of the better tools you have at your disposal comes for free in the pastel boxes - the strips of white styrofoam packing material they put in. Rip it into small squares and keep turning it at different angles to get the most use out of it. Rolling a piece into a thin long spike is good for detail areas.
My preferred blending tool though is my own hand. Hey, it makes for a filthy set of fingernails, but it sure gets the job done! Even when I use tools for different layers, such as the pastel packing strips, I like to finish up with my hands so I can smooth it down and make the chalk just right. One problem with using your hands is the fact that they get awfully dirty and you need them clean as you move from color to color, especially when working in lighter colors. Something handy that I like to use are the thick baby wipes. I always get the ones with Aloe Vera because they dry my hands out much less than the regular ones. They are a great relief when it is hot and dry and sore, and you can grab a wipe and moisten your hands. The thicker, better quality wipes, such as Baby Fresh, are well worth it - they go farther and have more moisture in them. A few of my friends use other things - one keeps a wet towel handy, and occasionally rinses it out. It's nice because you can always flop it over the back of your neck or your head when you are hot. Another sets up a small bowl of soapy water nearby and a couple towels. This was a great idea, just difficult in many places due to constrictions on size, and I sure wouldn't want to be the one who tips it over and soaks someone's painting - she usually sets it off to the side in some nearby bushes.
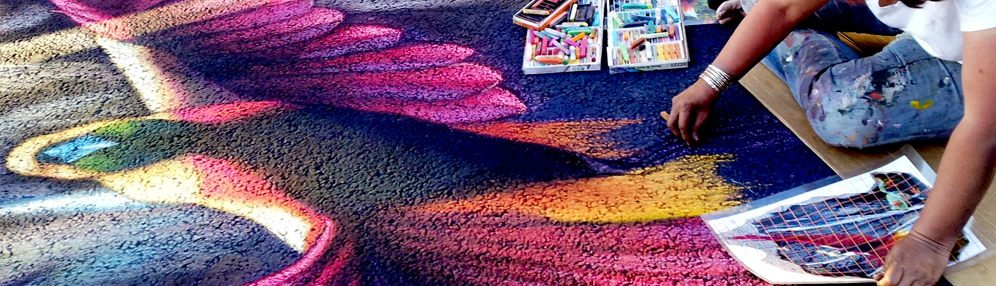
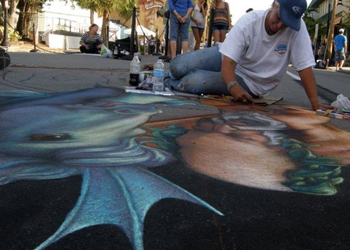
When painting such a large piece, you might wonder where to start - top? middle? bottom? I personally like to aim for something of importance, a focal point, right off the bat. It gives the public something to look at and gets me into the swing of things. Since I do mostly figurative work, there are usually faces in the top third of the painting, so this is what I work on. I'll focus on a few important things in the center section, then work above it and finish the top off, to the sides, and then down the painting. I usually finish an area completely before moving on. It's best to pay attention and not finish an area you are going to have to sit on top of later for more work somewhere else. While there are ways to move on top of the painting with little disturbance, the less risk, the better. Not to mention, if you are doing this out in public as a form of entertainment, covering up a finished portion is defeating the purpose.
To protect both the areas you are working on and your own self from the hot asphalt, you need something to sit on. Once again, personal preference is the key. Cardboard is cheap (free!) and causes little distrubance. Pretty much any smooth hard surface is the same - wood, plastic, etc. You can make a wooden platform that raises you a bit off the ground, though the added height that you have to bend down to work can bother your back. If you need to walk into the painting, wearing hard plastic or wooden soled shoes works well. Tennis shoes lift the pastel right up with each footprint. When I work I make several cards by laminating a color version of the painting I am doing. I might make a couple of these for different areas of the painting, and I might make them gridded first before I laminate, depending on how I am transferring the painting. These laminated cards have several purposes - not only do they stay clean (you can just wipe them with a baby wipe) and they are easier to hold than a sheet of paper, but they make great stepping stones for walking onto the painting. They are also handy for scooping up leftover pastels to move to another place.
Masking tape is handy when doing sharp, straight lines. You lay it down, paint on one side. Then lift it up and put down a new piece right on top of the pastel you painted, with the edge aligned and paint the other side. The masking tape only picks up minimal parts of what you've drawn and that can be touched up easily with your fingers or a tad more pastel.
True circles can be drawn by taking a piece of rope that is the radius of what you want to draw. tie one end of the string around a piece of pastel, tape the other end down securely into the center of where you want the circle to be and draw - it works like a giant compass.
Luckily for alot of us, pastel is one of the more forgiving mediums. By this I mean that it is fairly stable, there are no drying time issues, such as oils where it dries so slowly, or acrylics, where it dries so quickly, and it is pretty easy to fix mistakes - this is important! All of these properties make it a great medium to learn in. The fact that streetpaintings are usually done as temporary pieces encourages us to try new things, not to get too wrapped up in our mistakes, and, if we allow it, to enjoy that moment of creativity without worrying about the long term viability of the art we created. Pastels are our means to that end.
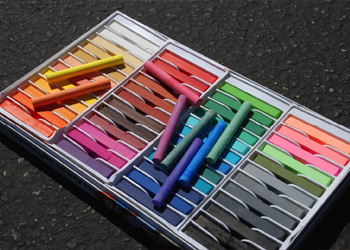
A pastel is basically a stick that is formed out of a type of clay-like material and allowed to dry. That claylike material is a combination of raw, dry pigments, a binder, and sometimes fillers. The binder is what glues everything together. There are many types of binders, from premade forms of chemicals, to recipes for homemade binders that are a combination of several materials. Fillers do just that - they fill space in the pastel so the pigment is extended out, as pigments tend to be the most expensive part of the pastel.
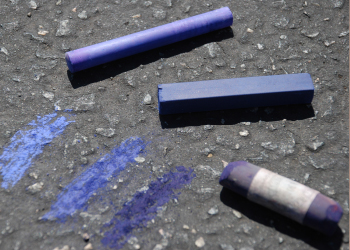
For streetpainting purposes there are certain types of pastels that work better than others. There are a couple of considerations to keep in mind when choosing pastels - one would be cost effectiveness. Let's face it, if the work isn't going to last more than a few days, archival qualities of pastels do not come into play. Buying the really expensive pastels doesn't make much sense. Another important property is how much "tackiness" the pastel has. While oil pastels should not be used, regular soft pastels often have some degree of oil or wax in them. The very cheap grades of pastels have very little of this, and are well suited to temporary works as they don't cost much and they clean away very easily. The downside to using them is that the pigments are very much "watered" down with fillers, so they are not as rich in color, and these pastels generate alot of dust since there is so very little tackiness. Higher quality pastels can be very nice to work with, less dusty and better colors, but they cost too much to make it a practical choice for most streetpainters. Many of the artists who streetpaint on a regular basis would like to use better pastels, at least for parts of the drawing where color is important. Pretty much any good quality pastel can be used, it is up to your discretion on how much you want to spend.
Alot of artists make their own pastels. There are several reasons for doing this. First off, the recipe that is popular among the artists I know works excellently for streetpainting. It is very tacky, and when mixed with the right pigments, goes onto the pavement with an almost buttery texture, which makes it a pleasure to blend and work with. This pastel also generates very little dust. Another reason that these work well is that the artist has control over the amount of pigment put in the pastel. Some artists use fillers, some do not (I don't). Because of the high amounts of pigments being used, these pastels will extend out over a large space of ground and the pigment will go a long way to coloring an area. Cost-wise, these pastels are well worth it. We use lots of pastels when making a painting, and stick for stick these usually cost much less than the sticks you can buy, besides the fact that the stick covers more area due to the high load of pigment. An example of this is a one pound bag of Prussian blue pigment will make 30-40 sticks of pastels - and yet you can buy that pigment for approximately $10. The cost of the binder is fairly minimal, so you can see the cost savings.
There are some downsides to making pastels. One would be the time involved and the initial cost of buying various materials for the binder and pigments. It can seem prohibitive, especially when you are not used to buying large amounts of pastels. Another consideration is that not all pigments work well with the binder and it really comes down to individual tests of materials to see how they work. There is no way to really know if you got it right until after the pastels have dried out (which takes a few days) - if the binder was off, that time is lost or you have wasted materials. Another consideration is the health factors of working with pigments in the raw form - they are a very fine dust and a dust mask of some sort should always be used. Some pigments have toxic qualities to them - if you choose to make them into pastels, remember you are taking risks both with yourself (especially with constant exposure) and to the people who live and work in the area where you are painting - pigments washed off streets and down drains are not healthy to be around. Some pigments are fairly safe - most of the earth pigments come into this catagory - and some pigments have *safer* (but not necessarily safe) options for them, such as the chemically pure versions of the Cadmiums which Daniel Smith Art Supply sells. Just try to be educated in your decisions and aware of the choices you are making. The last downside to making your own pastels is just the mess involved. This can be minimized somewhat by using disposable bowls and spoons for mixing, and keeping a box of surgical gloves handy - I put new gloves on with each new pigment, and manage to keep myself pretty clean. Pastels should *always* be made outside- not just for the mess factor, but also because you don't want the fine pigment dust floating around your house.
I've listed a few links to more information about places that supply premade pastels, a discussion of pigments, and the common recipe that many of the artists and festivals use.
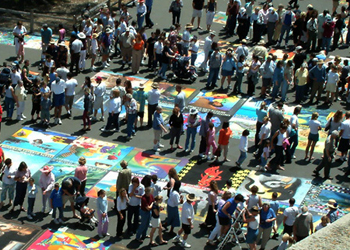
Chalk. It’s such a simple material, one used by children to draw their hopscotches in the street on a warm summer afternoon. In fact, in many of the chalk festivals that have risen up around the country, areas for children to draw are still integral to the use of the medium. But chalks – or pastels, rather – have also become a tool used by amateur and professional artists alike to create mind-bending temporary illusions as well as brilliant copies of historical masterworks in monumental sizes.
One might wander into one of these festivals – in the United States these festivals are a popular way of raising charitable funds - and be in awe of the beauty of the works to be found, but will often also ask questions of the artists such as, “Won’t you be sad when it washes away?” or, “why did you start doing this if you can’t keep it?!”. The answers to these questions are different from artist to artist, but for many of us it lies in the fact that these paintings were created in the first place to be just that – temporary – and that is how it has always been done, so we accept that fact of it’s impermanence as part of it’s beauty. These pastel paintings are part of a tradition that has been around for hundreds of years – well before the idea of today’s festivals were started.
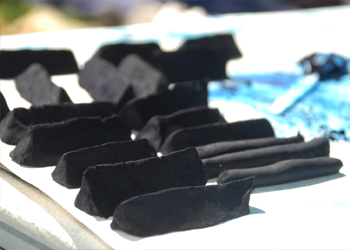
Most often the roots of the art form is attributed to southern Italy, where the creation of temporary iconic paintings on the ground became an integral part of the various performances to be found in the many small town and city religious festivals throughout the region. Much like wandering minstrels, the artists would create a painting out of pieces of chalk, earth minerals, charcoal…perhaps even bits of sand, broken glass or wood shavings. These paintings were created to help earn the artist the food they needed to sustain them selves, and once the festival ended, the artist would move to the next town for the next festival, their painting left behind to fade away with the elements.
However, while this art form is earliest documented in Italy, artists have always been resourceful. There are reports of these types of work created in other places, such as England, and it is not necessarily an automatic assumption that it was because artists saw the work in Italy. Chalk is an easy, inexpensive medium, and one often used to mark things temporarily. The paintings completed in the United Kingdom were quite different in nature from their Italian counterparts – often political satire and comments on current social conditions, they were almost opposite from the religious icons still being painted by their southern neighbors. In many ways it would be impossible to truly understand whether the art form spread or just cropped up at different times and places – and for many of us now days it doesn’t really matter. The paintings we do today are stamped as “Italian street paintings” and the type of work done is a far cry from any of its simpler ancestors.
While the original works were completed in fairly limited color and often with rudimentary painting skills, it is often the case in today’s festival to find sophisticated paintings that rival the original masterworks they recreate in beauty and skill. Hundreds of pastel colors might be used and even the pastels themselves tend to be much higher quality than earlier materials. The range of pigments available to artists today is astounding – and the freedom to create huge paintings, often hundreds of square feet over numerous days, make the works themselves even more astounding.
With the way that the images spread virally over the internet, the creators of these temporary masterpieces have found international fame and an ability to earn a living that far exceeds the level of their predecessors. With the addition in the early 1980’s of 3D street painting – attributed to American Kurt Wenner – it was only natural the art form would delve into this area at some point or another, just as all other ceiling and wall murals have done, and the illusions have brought an even wider audience. And now, just 30 years later, artists are commissioned around the world to create illusionistic temporary paintings that approach thousands of square feet for high end sponsors and corporations looking for a way to advertise that stands out from every other form of ad. Quite simply put, what a great idea to find a way where people are so impressed with the ad that they mass email the photos onto hundreds of friends and acquaintances. For the rare individual who happens across one of these paintings in person, it is a chance to see a rare moment in time for that is just what it is – reaching all the way back to 16th century Italy, this painting, no matter how grand or beautiful it is, will wash away as the weather turns, walk away on the bottom of someone’s shoes, and eventually the space will become nothing more than the simple street it was before this all started. Art, ephemeral beauty, internet sensation, children’s medium… the medium of street painting has run it’s full course and only continues to grow and change with our evolving times. Quite fitting, perhaps, for such a temporary substance to play such a versatile and unforgettable role in our current cultural awareness.
First off, on the day of the actual event, pray for no rain.
That being said, here are a few more tips.
Wear lots of sunscreen. I mean, lots of it. There aren't many things more miserable that burning in the first few hours of the first day, then spending the rest of the weekend in pain during the day, in pain during the night, and scrubbing a sunburn clean every afternoon.
You can choose to wear minimal clothes, or go for the idea of coverage. I spent my first years wearing minimal clothes, and have found that I last much better over the course of the weekend wearing things that cover me. I have less to worry about cleaning every evening, less exposure to the sun so no burns to worry about, and clothing tends to hold the moisture into your body much better (though you still need to drink lots of water!) so you are less likely to get sunsickness or dehydrated.
Take it easy in the middle of the day, when the heat is the worst. The best hours to work are the morning, and then the afternoon to evening. In summer, when it is light till 8 or 9 pm (depending on your latitude), many of the artists' preferred hours are the evening.
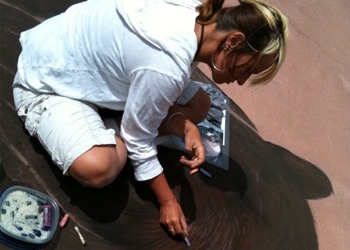
Putting your painting on the ground - there are several ways to do it. First off (and most frightening for many) is drawing it freehand. A number of artists use a "drawing stick"...a 3 or 4 foot long piece of 3/8" dowling. Just tape a piece of chalk at the end of it and draw away. It is a great way to see what you are doing a bit better, so you can keep your proportions correct.
A second way to transfer your drawing to the ground is to grid it out and blow it up, kind of like you see elementary school kids doing. You take your small copy and break it up into equal measurements that are the same as what you need to blow it up to. An example of this would be to take a 10x12" drawing, and break it into 1" squares. Each square would correspond with a one foot square on the ground if you were doing a 10x12 foot painting. Whatever measurements your final painting will be, it's easiest to divide your small copy into a square size that will be the same amount of squares as your one foot increments on your large painting - whether they be squares that are 4/3" each, or 1 1/2" each or whatever on the small copy. To grid out the big area for your painting, just run a tape measure down and mark off one foot increments. Now take one of those construction chalk snap lines (you can get them at any decent hardware store or Home Depot) and just snap lines down for each measurement. Voila! you have a giant grid that should match your small grid on your small copy. Now it is merely a matter of copying square to square, what you have in the small copy to the asphalt. Sounds simple, huh?
A third way of transferring your drawing is to make a pattern - called a pounce pattern (Not sure if I'm spelling that right). You draw out your design ahead of time onto cheap large paper, such as butcher paper. You can use an overhead projector to do this, or whatever works for you. After the drawing is on the paper, you use a small pattern wheel which is basically a metal wheel, approximately 1" in diameter, with metal teeth all the way around it. Running the pattern wheel over any lines in your design, it will punch small holes through the paper. Once you get to the festival you can lay the paper down and take loose powder chalk which you rub through the holes of the pattern. Traditionally what you would do is fill a piece of material with that chalk and basically beat the pattern with the chalk filled pounce, which forces the chalk through the holes. After you lift the pattern, you can go over the lines made with pastel sticks so they last better over the weekend as you work.
One thing of great importance at a festival is to remember that you are working around other people and the public. Try to contain your belongings in as small of an area as possible - keep walkways clear. Don't have open drinks at your painting - if you need to have a drink around, get a sports bottle or something similar where you can shut the top off when you aren't drinking. Watch what you are saying - there are usually kids around. Minimize the dust you create whenever possible, and when you do have dust, don't blow it on other people's paintings. Many artists use dustbusters to suck up their extra dust. Some people get very particular about their space - if you need to go into your neighbor's painting space, ask permission first and don't abuse the priviledge. Use the ideas of generosity and respect when you choose how to act around other painters and the public, and you can't really go wrong.
Below is a list of items you might be interested in bringing to a festival:
*SUNSCREEN*
water bottle
baby wipes with Aloe Vera
something to sit on (cardboard, platform, etc)
a hat
dustbuster
masking tape
measuring tape
chalk line
copies of the work you are going to paint
shade umbrella (not all festivals will allow these)
blending items such as an eraser
drawing stick
extra chalks in colors you need a larger amount of

Order Here
I was asked by London Publisher, Fil Rouge Press, if I would be interested in writing the first book published about street painting as an art form - technique, illusionary effects, history, festivals and materials. Little did I know how much I would enjoy it! My book has already had some great reviews, and includes everything you wanted to know about street painting, including galleries of works by various top artists from around the globe.
Most decent art stores will carry some sort of a selection of premade pastels. If you already know the specific colors you would like, you can also order out of open stock carried by some catalog companies. Below is a listing for Koss Pastels. Koss Pastels are the brand that many of the festivals give out to the artists. They are very inexpensive - not the best quality, obviously, but a good choice for the cost effectiveness and the amount of space you need to put pastel on. Koss only sells by the case, so most artists do not order from them directly, but the information is included here for festival coordinators or for those artists who do want to order in bulk.
Koss International Corporation 3250 Wilshire Blvd. Suite 2150 Los Angeles CA 90010 213.383.2474
Pigment Houses
Most of the art suppliers online also carry some of the supplies and raw pigments needed for making pastels. Daniel Smith particularly is a good supplier. They have their own brand of pigments which are pretty good quality and are probably the most cost effective, even compared to the pigment houses. Their range of colors is not anywhere near as broad as what Sinopia and Guerra carry, but they have a full enough range that it is a good place to start out at, and as you get better at making pastels, then you can think about ordering more specific ranges of colors from the pigment houses.
Sinopia
A pigment house located in San Francisco - excellent selection!
1.415.824.3180
Guerra Paint and Pigments
510 East 13th Street
New York, NY 10009
1.800.598.6589
With some items it makes more sense to purchase from some place other than an art store - usually because you put the word art in front of it, and the prices rise significantly! Items such as wheat and wallpaper paste, and boiled linseed oil can be found at places like Home Depot or other well stocked hardware/paint stores. One of the bext buys for Beeswax that I have found is General Wax and Candle Company, listed below. Most art supplies sell the beeswax pellets (pastilles) for somewhere around $13-20 a pound. From General it is more like $7 a pound for white beeswax pearls.
General Candle and Wax Company
6863 Beck Avenue
North Hollywood, CA 91605
1.800.929.7867
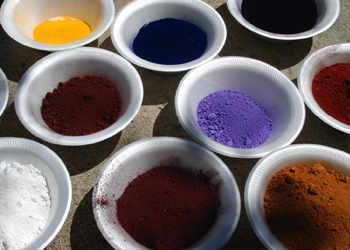
Since pastels are made of 90-95% raw pigment, it is important to use the correct, good quality pigment to get the best pastels. Some pigments just do not make very good pastels. Some pigments make excellent pastels, but the colors are so hazardous they should not be used either. Below is a beginning list of pigments and their properties as in regards to making street painting pastels. If there is anyone with further experience than what this list suggests in using pigments or making pastels, it would be most appreciated if they would conact me with that info so it can be added to what I have here right now.
Pigments come in different weights, according to what actual chemicals make up that particular pigment. An example of this would be to fill two 8 oz glasses with pigment - one with Cadmium Red and one with Carbon Black. The Cadmium Red glass would weight significantly more than the Lamp Black glass. As a generality, pigments that weigh more tend to be easier to make pastels out of. Pretty much any pigment can be turned into a workable pastel, given the time and resources to figure it out, so don't feel like this list is exclusively all you can use.
Some pigments that tend to make very nice quality pastels are as follows:
Titanium White
Buff Titanium White
Burnt Sienna
Raw Sienna
Yellow Ochre
Mars Violet
Mars Black
Mars Yellow
Ferrous Oxide Reds (Red Iron Oxide, Venetian Red)
The following pigment colors are workable and generally require a higher wax content to be used:
Prussian Blue (makes a very dark blue)
Pthalocyanine Blue
The following colors are workable with the addition of precipitated chalk added in:
Ultramarine Blue
Pthalocyanine Green
The following colors have eccentric mixing properties and rarely make good pastels, so should be avoided:
Alizarin Crimson
Burnt Umber
Chromium Oxide Green
****Regarding Cadmiums and Cobalts: While pastels made from these bases make very nice pastels both in consistency and vibrant color, these are two pigment bases that are recognized as toxic, especially over repeated exposure. I am told by people who sell pigments that they are both basically stable enough that there probably isn't much danger in being exposed on an occasional basis, but repeated exposure can be very hazardous. Also, completely avoid using anything with lead in it - Naples pigments or Lead White, etc. Viridian is also warned against for pastel use.
*Note* This is a recipe that has been given out over the years. It originally came from Kurt Wenner, who has since made adjustments to it to better suit his needs.
Pastel chalks are one of the most rewarding of artists' materials to make. Because of the huge variety of possible hues and shades, and because of their fragility, pastel chalks are difficult to market. The cost of pastels at the art store reflects the inconvenience of marketing them rather than the value of their ingredients. The artist who chooses to make pastels is rewarded with a significant savings, as well as, an improved and personalized palette.
Pastel chalks are simply pigment mixed with a binder and worked into a dough-like consistency. The dough is shaped into the desired form, rolled back and forth on a sheet of paper and left to dry. Care in the selection of the best pigments and binders and testing of different combinations will produce superior chalks.
The most famous and best quality binder for regular soft pastels is gum tragacanth. This can be ordered from various pigment houses and art supplies. One popular substitute is cellulose glue or methyl cellulose (sometimes bought as wallpaper paste). another similar binder is wheat starch. Common to all of these substances is the production of a heavy mucous substance with a very low binding power.
For the streetpainting artist, a binder with the feature of adding a bit of waxiness to the pastel makes a pastel that is not only easier to work with on the pavement, but also creates less dust. The specific recipe that a number of experienced street painting artists use is as follows:
1/4 cup of boiled Linseed oil (can be bought in the paint section at Home Depot)
3/4 cup (liquid measure) beeswax
5 oz. (1/2 cup) Ivory BAR Soap
2 1/2 cups water
wall paper paste solution (follow directions on package)
electric skillet and microwave
1. Melt the piece of beeswax in a microwave oven if available. Otherwise heat the beeswax in an electric skillet until liquid. MEasure 3/4 cup of the piquid beeswax and combine with 1/4 cup of Linseed oil. Remove excess beeswax from the skillet. Return the beeswax/oil solution to the electric skillet and heat to 350 degrees.
2. Grate Ivory bar soap and place in a pan with 2 cups of water. Over medium heat, bring to a rapid boil and stir with a French whisk until dissolved.
3. Pour boiling soap solution extremely slowly into 350 degree wax solution, beating rapidly with a French whisk until well combined. Add 1/2 cup of boiling water to the emulsion, whipping it constantly until well combined.
4. Pour emulsion into metal pan and place into ice water bath still stirring constantly. Stir until room temperature. The emulsion should be smooth and free of grains. The consistency should be like a heavy cream. You can add more or less boiling water in step number three to adjust the consistency.
5. Mix wall paper paste solution and combine equal part of beeswax/oil solution to an equal part of wallpaper paste solution for a waxier chalk. One part emulsion to two parts wall paper paste glue solution creates a normal chalk. Stir with a French whisk until combined.
Different combinations of the emulsion and glue mixtures can make almost any pigment usable. The pigments that weigh less generally need more emulsion to make chalks that match the more waxy colors such as Titanium and Cadmium produce. One part emulsion to two parts wallpaper paste glue solution creates a normal chalk. A half and half mixture creates a waxier one.
Every pigment will need a different proportion of binder. An experimental chalk should be made from each pigment to determine its properties. Once the binder is added to the pigment they are first mixed with a spatula. More pigment is added until a dough is formed. Balls of one color may be combined with balls of other colors to mix colors or make tints.
Pigments can also be thoroughly mixed while in the powder state before combining them with binder. It helps to have a mortar and pestle so the pigment is completely broken up and mixed. When forming the dough, one way to keep things clean and minimize work inbetween each new color is to use plastic spoons and bowls for mixing. Pairs of surgical gloves, changed with each new color, are also handy and protect you from being exposed unnecessarily to raw pigments. A dust mask should always be used as the raw pigments are such a fine dust, it will permeate the air and is a health hazard. Raw pigments should only be worked with outside.
Care on forming pastels will yield a better product. Pastels should be formed between fingers to their approximate shape, and only rolled back and forth in one or two passes to round them. Rolling pastels too much will make the glue leach to the outside, forming a shell.